.JPG) This kit is designed to work with the full frame Glocks like the KWA KSC G17, G18c as well as the WE G17. Now dont get me wrong, I am sure that there are other Glocks out there that work with it. Such as the KWC or the HFC. However I am not sold on the quality of either of those models. Now we are going to be assemblying this model with the WE G17. As it is the newest model on the market. Amd i personally like the WE brand. As you can probably see from my reviews both here on my blog and on my youtube chanel. Be sure to check it out https://www.youtube.com/user/airsoftgooroo Any way while we were messing around with the APS we found out that the KJW G23 compact pistol will also fit in the APS unit. That is great as it will make it so more people will be able to use it.
This kit is designed to work with the full frame Glocks like the KWA KSC G17, G18c as well as the WE G17. Now dont get me wrong, I am sure that there are other Glocks out there that work with it. Such as the KWC or the HFC. However I am not sold on the quality of either of those models. Now we are going to be assemblying this model with the WE G17. As it is the newest model on the market. Amd i personally like the WE brand. As you can probably see from my reviews both here on my blog and on my youtube chanel. Be sure to check it out https://www.youtube.com/user/airsoftgooroo Any way while we were messing around with the APS we found out that the KJW G23 compact pistol will also fit in the APS unit. That is great as it will make it so more people will be able to use it..JPG)
.JPG) So here we go the first thing we want to show you is the parts that come with the kit. You get the basic body assembly, it will come with the vertical fore grip as well as 3 charging handles that will allow you to use multiple Glock pistols. There is one for the "Airsoft 18" one for the "Airsoft 17" and the "RAM Combat" We did find out that the WE G17 is a little wider that the KWA KSC G17 and when you asseble the APS with the G17 charging handle the guns slide may jam up just a little bit when using and that is a bad thing. The last thing you want is for your weapon to bind up on you in mid game... When we took the kit apart and try to find why it was binding up we noticed that the charging handle was visibly bowing making the charging handle bind in the body of the APS. Now when we saw that we were ready to say ok this wont work. But for some reason i was tinkering around with the "Arsoft 18" charging handle and I noticed that the charging handle was not bowing at all.
So here we go the first thing we want to show you is the parts that come with the kit. You get the basic body assembly, it will come with the vertical fore grip as well as 3 charging handles that will allow you to use multiple Glock pistols. There is one for the "Airsoft 18" one for the "Airsoft 17" and the "RAM Combat" We did find out that the WE G17 is a little wider that the KWA KSC G17 and when you asseble the APS with the G17 charging handle the guns slide may jam up just a little bit when using and that is a bad thing. The last thing you want is for your weapon to bind up on you in mid game... When we took the kit apart and try to find why it was binding up we noticed that the charging handle was visibly bowing making the charging handle bind in the body of the APS. Now when we saw that we were ready to say ok this wont work. But for some reason i was tinkering around with the "Arsoft 18" charging handle and I noticed that the charging handle was not bowing at all.So we assembled it with the "Airsoft 18" charging handle and the gun did not bind! That was a great thing to find. We loaded it up and the gun performed great. A full mag with no issue, now in all honesty we wont get a true change in performance as it is just a body kit. But it gives you more of a tactical feel to the gun. We decided to try it with the KJW G23 as well and the same result both with the charging handle and the performance of the gun. Now we will walk you through the assembly of the kit.
First thing is first take the kit out of the box. HAHA! yeah obvious right ... but in all seriousness
1. Locate the body pins on the front and rear of the body kit.
2. Remove the body pins, these body pins push out from the reverse side of the body. The body pins may be stiff , and you may want to use a tool to push the pin through.
3 Pull the front end off the body kit.
4. Extend the stock and slide the rear body lock out.
5. Unfold the body kit.
6.Now take the G17 G18 or G23 and add the Charging handle to the gun.
7. Place the gun in the body kit.
8. Close the body kit, be sure it is fully closed.
9. slide the rear body lock into place
10. Replace the front of the body kit & install body pin
now load your gun and have fun.
Some of the guns have the ability to accept an extended mag like this.
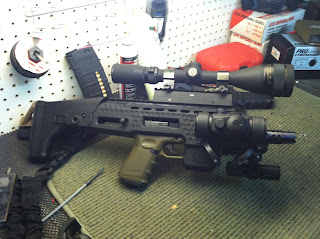
Now at this point we decided to have a little fun with the kit and we put the KJW G23 in it, and added as many rail accesories as we could to it. such as a long distance scope, tactical light, 1x30 red dot and a side mounted verticle grip. We did this to show you that you can literaly do almost anything with this gun. And you can add whatever you want to it. I do not recomend doing this at all. But we did it just to laugh, and laugh we did. We also took some tacticool poses with one of the guys off my team. We hope you enjoy them.

Well as far as this kit is concerned we give it a 9 start rating, Thanks for reading this review.

This is Dean Donavan signing off for the GuRu Crew.
Be sure to Freind me and like me on face book
http://www.facebook.com/dean.donavan
Also follow The Airsoft GuRu on Twitter
.JPG)
.JPG)
.JPG)
.JPG)
.JPG)
.JPG)
.JPG)
.JPG)
.JPG)
.JPG)
.JPG)

.JPG)
.JPG)
.JPG)
.JPG)
.JPG)


